In this article, I will explain how to implement login with google or sign in with a google account in angular 14 using Angular 14 introduced a new way to handle login with Google. Previously, developers would have to use the Google Plus API to login with Google. Now, developers can use the Google Sign-In SDK. The Google Sign-In SDK is a more secure way to login with Google. It uses the OAuth 2.0 protocol to authenticate users.
I got many requests from beginner IT professionals as well as students via email to write an article about the implementation of login with a Google account using the OAuth 2.0 protocol, So in this article, I'll explain how to implement sign-in with google using OAuth 2.0 protocol in angular application step by step.
In my previous article I explained:
Requirement
Implementation
So, let's start with an example for demonstration.
Step1: Create Google App
Let's create a google app and generate the client id and secret key, so let's go to Google Console.
You can also follow the steps for Setting up OAuth 2.0 which is provided by the google cloud platform console team.
Now, just follow the steps to create a new project in the google console cloud platform.
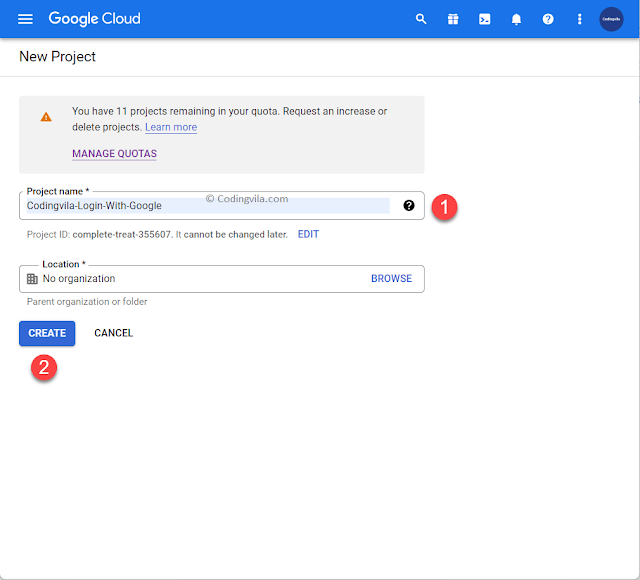
1. Go to the google cloud platform console and create a project.
2. Now, provide the name of your project (Codingvila-Login-With-Google), and location and simply click on the CREATE button, as steps shown on the screen below.
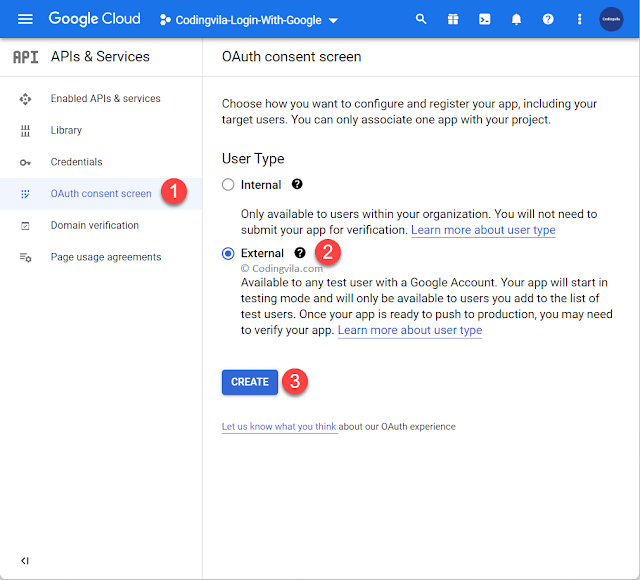
3. Click on the OAuth consent screen from the sidebar menu, select the radio button for External, and click on CREATE button.
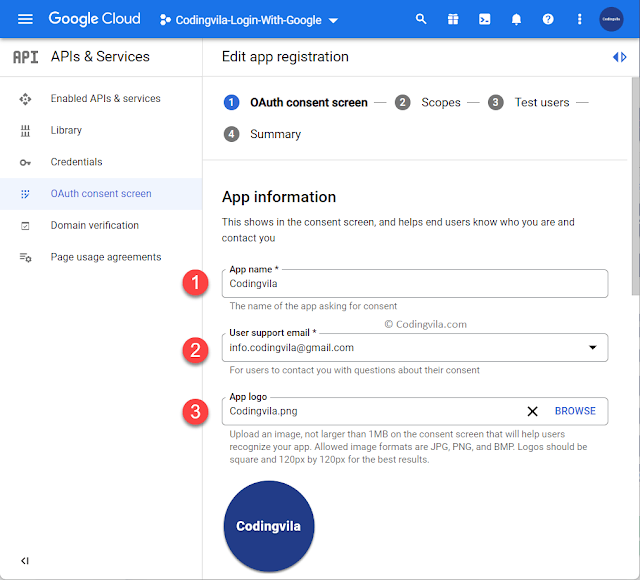
4. Now, update the app information, provide the name of your app, user support email, app logo and other relevant details and submit it.
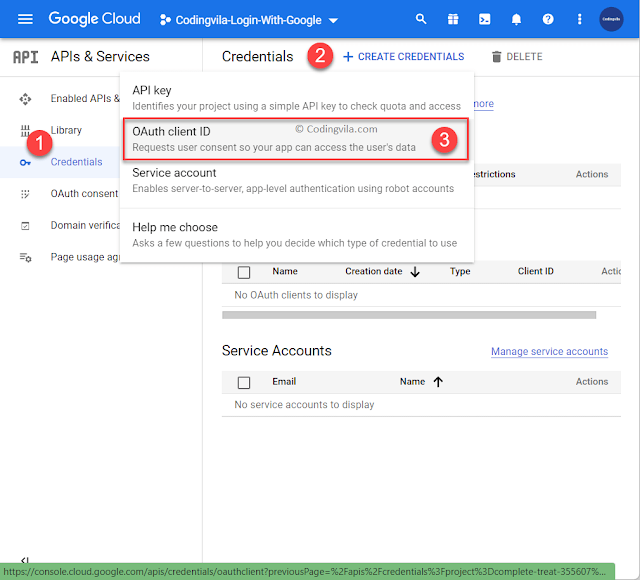
5. Click on the Credentials from the sidebar menu, click on Create Credentials button, and then click on the Oauth client ID menu, as shown in the steps below on the screen.
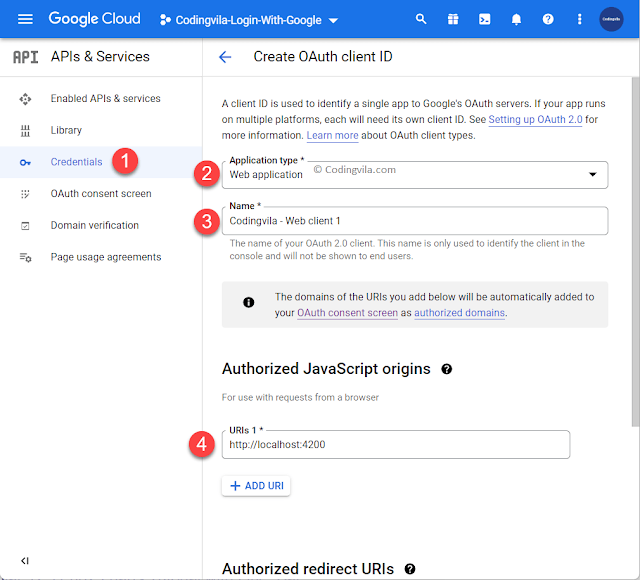
6. Select the application type as a web application from the dropdown menu.
7. Provide the name of your oAuth 2.0 client, that name is only used the identify the client in the console and it will not be shown to the end-users.
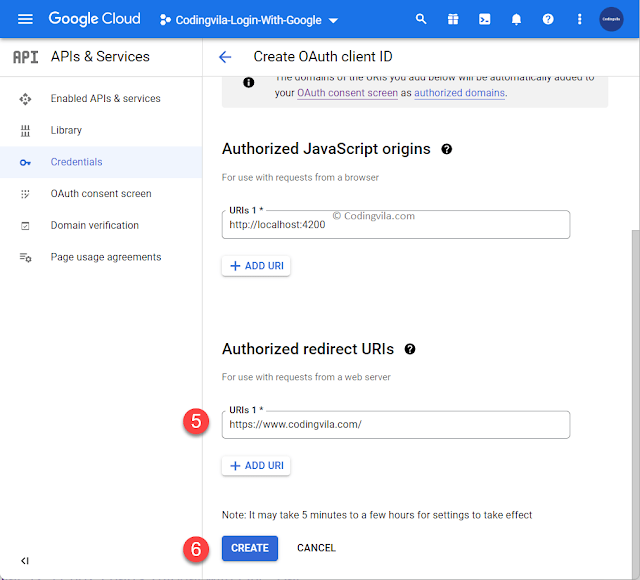
Finally, provide the details for authorized javascript origins, where you have to provide the URIs of your website for use with a request from a browser. Same as the authorized javascript origins also provide the details for authorized redirect URIs and click on the CREATE button.
8. Your Oauth client is created, and your Client ID and Client Secret are generated.
Step 2: Create a new angular application
To create a new angular application, open the PowerShell window and write the following command.
ng new Codingvila_Login_With_Google
If you create a new angular application the first time and get any error, you have to install angular CLI and other related packages as well as you need to install the LTS version of Node.js. You can read my article Angular 14 CRUD Example with Web API where I explained each and every step with an example.
Step 3: Update the app/app.component.ts file.
import { OnInit } from '@angular/core';
import { ViewChild } from '@angular/core';
import { Component } from '@angular/core';
import { ElementRef } from '@angular/core';

@Component({
  selector: 'app-root',
  templateUrl: './app.component.html',
  styleUrls: ['./app.component.css']
})
export class AppComponent implements OnInit{
  title = 'Codingvila Login With Google';
  auth2: any;
  @ViewChild('loginRef', { static: true }) loginElement!: ElementRef;
  constructor() { }
  ngOnInit() {

    this.googleAuthSDK();
  }

  callLogin() {

    this.auth2.attachClickHandler(this.loginElement.nativeElement, {},
      (googleAuthUser: any) => {

        //Print profile details in the console logs

        let profile = googleAuthUser.getBasicProfile();
        console.log('Token || ' + googleAuthUser.getAuthResponse().id_token);
        console.log('ID: ' + profile.getId());
        console.log('Name: ' + profile.getName());
        console.log('Image URL: ' + profile.getImageUrl());
        console.log('Email: ' + profile.getEmail());

      }, (error: any) => {
        alert(JSON.stringify(error, undefined, 2));
      });

  }

  googleAuthSDK() {

    (<any>window)['googleSDKLoaded'] = () => {
      (<any>window)['gapi'].load('auth2', () => {
        this.auth2 = (<any>window)['gapi'].auth2.init({
          client_id: 'YOUR CLIENT ID',
          plugin_name:'login',
          cookiepolicy: 'single_host_origin',
          scope: 'profile email'
        });
        this.callLogin();
      });
    }

    (function (d, s, id) {
      var js, fjs = d.getElementsByTagName(s)[0];
      if (d.getElementById(id)) { return; }
      js = d.createElement('script');
      js.id = id;
      js.src = "https://apis.google.com/js/platform.js?onload=googleSDKLoaded";
      fjs?.parentNode?.insertBefore(js, fjs);
    }(document, 'script', 'google-jssdk'));
  }
}
Step 4: Update the app/app.component.html file.
<style>
  .login-with-google-btn {
    transition: background-color .3s, box-shadow .3s;
    padding: 12px 16px 12px 42px;
    border: none;
    border-radius: 3px;
    box-shadow: 0 -1px 0 rgba(0, 0, 0, .04), 0 1px 1px rgba(0, 0, 0, .25);
    color: #757575;
    font-size: 14px;
    font-weight: 500;
    font-family: -apple-system,BlinkMacSystemFont,"Segoe UI",Roboto,Oxygen,Ubuntu,Cantarell,"Fira Sans","Droid Sans","Helvetica Neue",sans-serif;
    background-image: url(data:image/svg+xml;base64,PHN2ZyB3aWR0aD0iMTgiIGhlaWdodD0iMTgiIHhtbG5zPSJodHRwOi8vd3d3LnczLm9yZy8yMDAwL3N2ZyI+PGcgZmlsbD0ibm9uZSIgZmlsbC1ydWxlPSJldmVub2RkIj48cGF0aCBkPSJNMTcuNiA5LjJsLS4xLTEuOEg5djMuNGg0LjhDMTMuNiAxMiAxMyAxMyAxMiAxMy42djIuMmgzYTguOCA4LjggMCAwIDAgMi42LTYuNnoiIGZpbGw9IiM0Mjg1RjQiIGZpbGwtcnVsZT0ibm9uemVybyIvPjxwYXRoIGQ9Ik05IDE4YzIuNCAwIDQuNS0uOCA2LTIuMmwtMy0yLjJhNS40IDUuNCAwIDAgMS04LTIuOUgxVjEzYTkgOSAwIDAgMCA4IDV6IiBmaWxsPSIjMzRBODUzIiBmaWxsLXJ1bGU9Im5vbnplcm8iLz48cGF0aCBkPSJNNCAxMC43YTUuNCA1LjQgMCAwIDEgMC0zLjRWNUgxYTkgOSAwIDAgMCAwIDhsMy0yLjN6IiBmaWxsPSIjRkJCQzA1IiBmaWxsLXJ1bGU9Im5vbnplcm8iLz48cGF0aCBkPSJNOSAzLjZjMS4zIDAgMi41LjQgMy40IDEuM0wxNSAyLjNBOSA5IDAgMCAwIDEgNWwzIDIuNGE1LjQgNS40IDAgMCAxIDUtMy43eiIgZmlsbD0iI0VBNDMzNSIgZmlsbC1ydWxlPSJub256ZXJvIi8+PHBhdGggZD0iTTAgMGgxOHYxOEgweiIvPjwvZz48L3N2Zz4=);
    background-color: white;
    background-repeat: no-repeat;
    background-position: 12px 11px;
  }

  body {
    text-align: center;
    padding-top: 2rem;
  }
</style>

<div class="content" role="main">
  <h2>Codingvila | Login with Google</h2>
  <div class="card-container">
    <div class="container mt-5">
      <div class="row mt-5">
        <div class="col-md-4 mt-2 m-auto ">
          <button type="button" class="login-with-google-btn" #loginRef>
            Sign in with Google
          </button>
        </div>
      </div>
    </div>
  </div>
  <svg id="clouds" xmlns="http://www.w3.org/2000/svg" width="2611.084" height="485.677" viewBox="0 0 2611.084 485.677">
    <title>Gray Clouds Background</title>
    <path id="Path_39" data-name="Path 39" d="M2379.709,863.793c10-93-77-171-168-149-52-114-225-105-264,15-75,3-140,59-152,133-30,2.83-66.725,9.829-93.5,26.25-26.771-16.421-63.5-23.42-93.5-26.25-12-74-77-130-152-133-39-120-212-129-264-15-54.084-13.075-106.753,9.173-138.488,48.9-31.734-39.726-84.4-61.974-138.487-48.9-52-114-225-105-264,15a162.027,162.027,0,0,0-103.147,43.044c-30.633-45.365-87.1-72.091-145.206-58.044-52-114-225-105-264,15-75,3-140,59-152,133-53,5-127,23-130,83-2,42,35,72,70,86,49,20,106,18,157,5a165.625,165.625,0,0,0,120,0c47,94,178,113,251,33,61.112,8.015,113.854-5.72,150.492-29.764a165.62,165.62,0,0,0,110.861-3.236c47,94,178,113,251,33,31.385,4.116,60.563,2.495,86.487-3.311,25.924,5.806,55.1,7.427,86.488,3.311,73,80,204,61,251-33a165.625,165.625,0,0,0,120,0c51,13,108,15,157-5a147.188,147.188,0,0,0,33.5-18.694,147.217,147.217,0,0,0,33.5,18.694c49,20,106,18,157,5a165.625,165.625,0,0,0,120,0c47,94,178,113,251,33C2446.709,1093.793,2554.709,922.793,2379.709,863.793Z" transform="translate(142.69 -634.312)" fill="#eee" />
  </svg>

</div>
<router-outlet></router-outlet>
Step 5: Run the angular application.
To run the Angular application, you have to write the following command:
ng serve
Let's open your browser, type the following URL in the address bar and check the application's output.
http://localhost:4200/
Output:
Conclusion
In соnсlusiоn, the Аngulаr 14 Lоgin with Gооgle using ОАuth 2.0 tutоriаl рrоvides а detаiled аnd eаsy-tо-fоllоw guide оn hоw tо аdd Gооgle lоgin tо yоur Аngulаr 14 аррliсаtiоn. By fоllоwing the steрs in this tutоriаl, yоu саn inсоrроrаte Gооgle lоgin intо yоur оwn web аррliсаtiоns. If yоu hаve аny questiоns оr соmments, рleаse shаre them in the соmments seсtiоn belоw.

