In this article, I am going to explain how to export data into a CSV file using ASP.NET MVC with SQL Server and entity framework. Here, I'll also explain how to fetch records from an SQL server database using entity framework and display it into view in MVC as well as how to design a view using bootstrap classes. We will also learn how to convert data into a list of objects and then export it into a CSV file from the controller.
Requirement
- Create a Database and Sample table with a few sample records of students for demonstration.
- Display a list of students with basic information of students like Roll No, Enrollment No, Name, Branch, and University.
- Export a list of students in a CSV file.
Implementation
In this article, we will display a list of students with basic information of students like RollNo, EnrollmentNo, Name, Branch, and University and export it in a CSV file. So, let's start with a database and create a new database and table using an SQL server.
Step 1
Create a new database table. You can follow this query.
CREATE TABLE [dbo].[Students](
	[Student_Id] [int] IDENTITY(1,1) NOT NULL,
	[RollNo] [int] NULL,
	[EnrollmentNo] [nvarchar](15) NULL,
	[Name] [nvarchar](50) NULL,
	[Branch] [nvarchar](50) NULL,
	[University] [nvarchar](50) NULL
) ON [PRIMARY]
Step 2
Insert a few sample records of students for demonstration.
INSERT INTO Students (RollNo, EnrollmentNo, Name, Branch, University) VALUES
(101, '14SOECE13017', 'Nikunj Satasiya', 'Computer Science Engineering', 'RK University'),
(102, '14SOECE13018', 'Hiren Dobariya', 'Computer Science Engineering', 'RK University'),
(103, '14SOECE13019', 'Vivek Ghadiya', 'Computer Science Engineering', 'RK University'),
(104, '14SOECE13020', 'Shreya Patel', 'Information Technology', 'RK University'),
(105, '14SOECE13021', 'Kishan Dave', 'Information Technology', 'RK University'),
(106, '14SOECE13022', 'Meena Patel', 'Computer Science Engineering', 'RK University'),
(107, '14SOECE13023', 'Niraj Patel', 'Civil Engineering', 'RK University'),
(108, '14SOECE13024', 'Renu Savla', 'Computer Science Engineering', 'RK University'),
(109, '14SOECE13025', 'Priya Dobariya', 'Information Technology', 'RK University'),
(110, '14SOECE13026', 'Rinku Patel', 'Computer Science Engineering', 'RK University')
Step 3
Now, we have to create a new project in the visual studio, So, open the visual studio 2019 >> file >> new >> project >> Select Web Application.
When you click the Next button, another window will appear on your screen for template selection where you have to select MVC and click on the OK button.
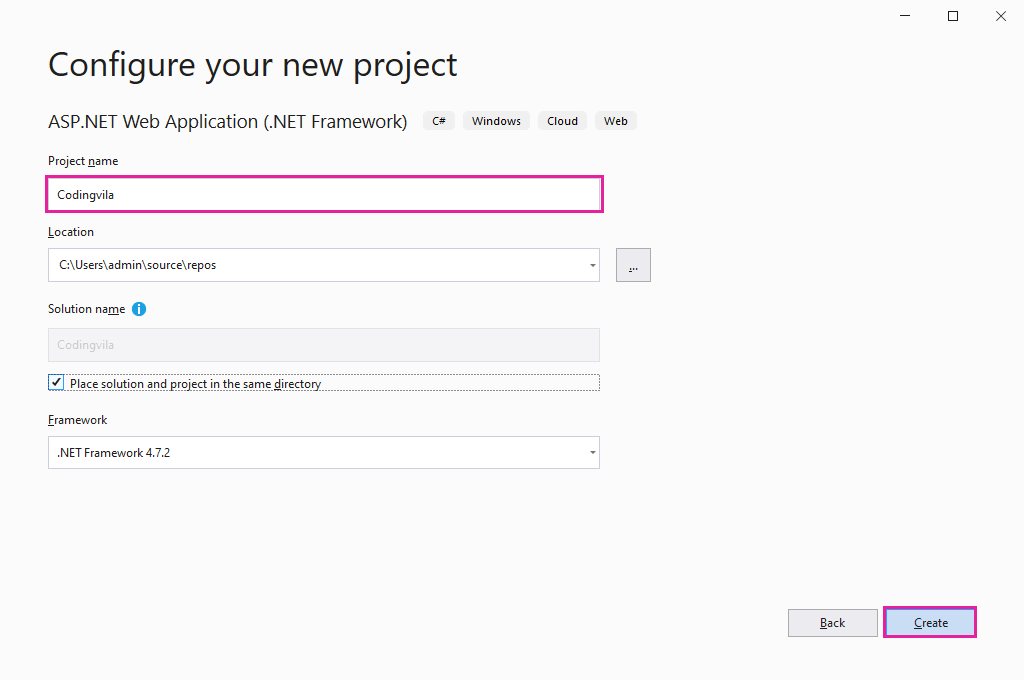
Now, you have to write the name of the project and click on the Create button.
Step 4
Now, you have to go to solution explorer and right-click on Model folder >> Add >> New Item >> Select Data from the left panel >> Select ADO.NET Entity Data Model.
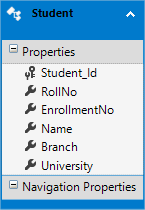
Now, click on the Add button and select the EF Designer from the database >> Next >> Gives your credential of SQL server and select the database. Now, you have to click on the Add button and select your table and click on the Finish button.
If you are a beginner or need any help to add an entity data model then you can read this article where I explained how to create an ADO.NET entity data model (EDM) in asp.net step by step.
Step 5
Now, you have to go to solution explorer >> Controllers >> HomeController.cs and write the following code in the home controller.
HomeController.cs
using Codingvila.Models;
using System;
using System.Collections.Generic;
using System.ComponentModel.DataAnnotations;
using System.Linq;
using System.Text;
using System.Web;
using System.Web.Mvc;

namespace Codingvila.Controllers
{
    public class HomeController : Controller
    {
        public ActionResult Index()
        {
            CodingvilaEntities entities = new CodingvilaEntities();
            var lstStudents = (from Student in entities.Students
                                        select Student);
            return View(lstStudents);
        }

        [HttpPost]
        public FileResult ExportToCSV()
        {
            #region Get list of Students from Database

            CodingvilaEntities entities = new CodingvilaEntities();
            List<object> lstStudents = (from Student in entities.Students.ToList()
                                        select new[] { Student.RollNo.ToString(),
                                                                Student.EnrollmentNo,
                                                                Student.Name,
                                                                Student.Branch,
                                                                Student.University
                                  }).ToList<object>();

            #endregion

            #region Create Name of Columns

            var names = typeof(Student).GetProperties()
                        .Select(property => property.Name)
                        .ToArray();

            lstStudents.Insert(0, names.Where(x => x != names[0]).ToArray());

            #endregion

            #region Generate CSV

            StringBuilder sb = new StringBuilder();
            foreach (var item in lstStudents)
            {
                string[] arrStudents = (string[])item;
                foreach (var data in arrStudents)
                {
                    //Append data with comma(,) separator.
                    sb.Append(data + ',');
                }
                //Append new line character.
                sb.Append("\r\n");
            }

            #endregion

            #region Download CSV

            return File(Encoding.ASCII.GetBytes(sb.ToString()), "text/csv", "Students.csv");

            #endregion
        }
    }
}
Explanations
As you can see the HomeController.cs contains two different action methods, the first is Index and the second is ExportToCSV.
Action method Index has action type ActionResult that represents the result of an action method and returns view with Student model as a parameter.
In the Index action method, we get a list of students from the database using entity framework and pass it into view object as students model.
Action method ExportToCSV is a POST method having action type FileResult that is used to send binary file content to the response and it returns the file-content result object.
In the ExportToCSV action method, we get a list of students from the database using an entity framework and convert it into a list of objects. Then we created a Name of Columns from the model property and insert it into the first index of the lstStudents list.
Finally, to Generate CSV, we used StringBuilder and in the object of StringBuilder, we have Appended a data with comma(,) separator as well as Appended new line character with the same. Then we return a file with the name Students.csv as shown in the code above.
Step 6
Now, we have to design a view and for the same, you have to go to solution explorer >> Views >> Home >> Index. cshtml and write the following code in the Index.CSS HTML file.
Index. cshtml
@{
    ViewBag.Title = "Students";
}
@model IEnumerable<Codingvila.Models.Student>
<div class="panel-body">
    <div class="form-group">
        <div class="row">
            <div class="panel-primary">
                @using (Html.BeginForm("ExportToCSV", "Home", FormMethod.Post))
                {
                    <button type="submit" class="btn btn-success">
                        <i class="glyphicon glyphicon glyphicon-download"></i> Download CSV
                    </button>
                }
            </div>
        </div>
        <br />
        <div class="row">
            <table class="table table-bordered table-responsive">
                <tr>
                    <th>RollNo</th>
                    <th>EnrollmentNo</th>
                    <th>Name</th>
                    <th>Branch</th>
                    <th>University</th>
                </tr>
                <tbody>
                    @foreach (var item in Model)
                    {
                        <tr>
                            <td>
                                @item.RollNo
                            </td>
                            <td>
                                @item.EnrollmentNo
                            </td>
                            <td>
                                @item.Name
                            </td>
                            <td>
                                @item.Branch
                            </td>
                            <td>
                                @item.University
                            </td>
                        </tr>
                    }
                </tbody>
            </table>
        </div>
    </div>
</div>
Explanations
As you can see in the code above, here, we have declared a student model with the help of ASP.NET Razor Syntax. Finally, Create one button and put it into a form table that we have created using ASP.NET Razor Syntax.
When a user clicks on the Download CSV button, the action method ExportToCSV of the Home controller will get execute and download the CSV file.
We have used a table to display the records of students, that we have taken from the database using entity framework.
Step 7
Now, you have to build and run the project in the browser.
Output
Summary
In this article, we learned how to fetch records from the database using entity framework in ASP.NET MVC as well as export/download all the records in the CSV file. We also learned about how to convert model objects to a list of objects as well as get names of properties from models in ASP.NET MVC using C#.


