Introduction
This article gives an explanation about how to export GridView to excel using jquery with bootstrap 4 in asp.net web forms as well as also show how to bind a GridView using a Datatable.
In my previous article, I explained how to export an angular js table in an excel using jquery plugin with bootstrap 4 in asp.net web forms. I got many emails and comments where many of beginners requested to write and publish an article for export HTML table or GridView to excel without using angular js, few of them also requested for sample/demo source code for export GridView to excel, Finally, In this article, I'll explain how to bind GridView as well as how to export GridView to excel using table2excel JQuery in ASP.NET web forms.
Requirement
1) Explain how to export GridView to excel using JQuery plugin in ASP.NET web forms with example.
Implementation
If you read my previous article then you know, I explained what is table2excel jQuery plugin as well as its parameters and use of this jQuery plugin for export HTML table to excel. To read my previous article about export HTML table to excel using table2excel JQuery plugin you can visit this reference link.
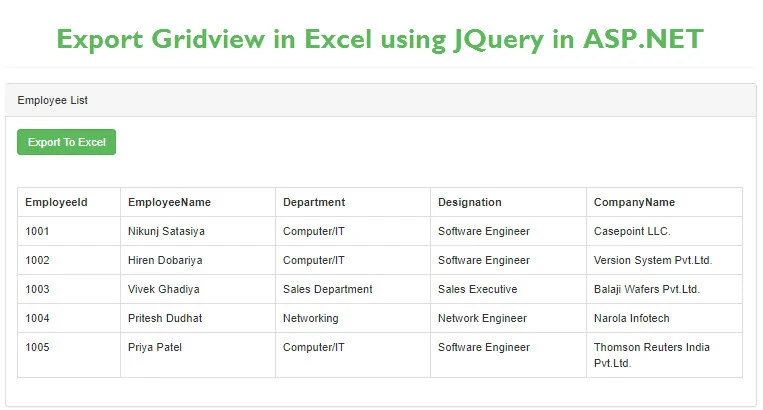
Now, let's take one simple example of the employee management system, where we will bind the list of the employees with basic details of employees such as employee Id, employee name, department, designation, company name into GridView using Datatable, then we will export GridView to export using table2excel JQuery plugin.
Example
First, you have to include jquery.min.js, as well as table2excel.js file in your project and then put the following lines in the aspx file or master page of asp.net web forms application before end <head> tag to link that javascript with your application.
<script type="text/javascript" src="https://ajax.googleapis.com/ajax/libs/jquery/2.2.4/jquery.min.js"></script>
<script src="table2excel.js"></script>
Finally, we will design our aspx form with bootstrap 4, so include CDN links of bootstrap before the end <head> tag and then design for with GridView and one simple HTML button for export GridView to excel.
<%@ Page Language="C#" AutoEventWireup="true" CodeFile="CS.aspx.cs" Inherits="_Default" %>

<!DOCTYPE html PUBLIC "-//W3C//DTD XHTML 1.0 Transitional//EN" "http://www.w3.org/TR/xhtml1/DTD/xhtml1-transitional.dtd">
<html xmlns="http://www.w3.org/1999/xhtml">
<head runat="server">
    <title></title>
    <meta charset="utf-8" />
    <meta name="viewport" content="width=device-width, initial-scale=1" />
    <link rel="stylesheet" href="https://maxcdn.bootstrapcdn.com/bootstrap/3.4.0/css/bootstrap.min.css" />
    <script src="https://ajax.googleapis.com/ajax/libs/jquery/3.4.1/jquery.min.js"></script>
    <script src="https://maxcdn.bootstrapcdn.com/bootstrap/3.4.0/js/bootstrap.min.js"></script>
    <script type="text/javascript" src="https://ajax.googleapis.com/ajax/libs/jquery/2.2.4/jquery.min.js"></script>
    <script src="table2excel.js"></script>

</head>
<body>
    <div class="container">
        <form id="form1" runat="server">
            <div class="row">
                <div class="col-lg-12">
                    <div class="panel panel-heading">
                        <div class="panel-heading text-center">
                            <h1>Employee Management System</h1>
                        </div>
                    </div>
                </div>
                <div class="col-lg-12">
                    <div class="panel panel-default">
                        <div class="panel-heading">Employee List</div>
                        <div class="panel-body">
                            <div class="row col-lg-2">
                                <input type="button" id="btnExporttoExcel" class="btn btn-success" value="Export To Excel" />
                            </div>
                            <br />
                            <br />
                            <asp:GridView ID="grdEmp" CssClass="table table-bordered" runat="server"
                                AutoGenerateColumns="false">
                                <Columns>
                                    <asp:BoundField DataField="EmployeeId" HeaderText="EmployeeId" ItemStyle-Width="100" />
                                    <asp:BoundField DataField="EmployeeName" HeaderText="EmployeeName" ItemStyle-Width="150" />
                                    <asp:BoundField DataField="Department" HeaderText="Department" ItemStyle-Width="150" />
                                    <asp:BoundField DataField="Designation" HeaderText="Designation" ItemStyle-Width="150" />
                                    <asp:BoundField DataField="CompanyName" HeaderText="CompanyName" ItemStyle-Width="150" />
                                </Columns>
                            </asp:GridView>
                        </div>
                    </div>
                </div>
            </div>
        </form>
    </div>
</body>
</html>
Now, you have to write following Javascript code before end <body> tag.
<script type="text/javascript">
    $(function () {
        $("#btnExporttoExcel").click(function () {
            $("#grdEmp").table2excel({
                filename: "Employee.xls",
                exclude_img: true,
                exclude_links: true,
                exclude_inputs: true

            });
        });
    });
    </script>
Explanation
As you can see in the javascript written above here, we have called a javascript function on click of btnExporttoExcel, we will use this button for export data in the excel sheet. Then we have called function table2excel for GridView grdEmp and we've passed parameters filename for the name of excel sheet, exclude image, links and inputs parameters for excluding image, links and inputs while export excels sheets.
Note: You can export any HTML table using table2excel JQuery plugin either it can be simple HTML Table, AngularJs table, Jquery Datatable, Web grid, GridView or anything else, you just have to replace id parameter of an export button and HTML table in the script above.
Now, we will prepare a function GetEmployeeData() that returns Datatable with columns employee Id, employee name, department, designation and company name.
private DataTable GetEmployeeData()
    {
        try
        {
            DataTable dt = new DataTable();
            dt.Columns.AddRange(new DataColumn[5] { new DataColumn("EmployeeId"), new DataColumn("EmployeeName"), new DataColumn("Department"), new DataColumn("Designation"), new DataColumn("CompanyName") });
            dt.Rows.Add(1001, "Nikunj Satasiya", "Computer/IT", "Software Engineer", "Casepoint LLC.");
            dt.Rows.Add(1002, "Hiren Dobariya", "Computer/IT", "Software Engineer", "Version System Pvt.Ltd.");
            dt.Rows.Add(1003, "Vivek Ghadiya", "Sales Department", "Sales Executive", "Balaji Wafers Pvt.Ltd.");
            dt.Rows.Add(1004, "Pritesh Dudhat", "Networking", "Network Engineer", "Narola Infotech");
            dt.Rows.Add(1005, "Priya Patel", "Computer/IT", "Software Engineer", "Thomson Reuters India Pvt.Ltd.");
            return dt;
        }
        catch (Exception)
        {
            throw;
        }
    }
Now we will bind GridView on load event of the page as shown in the code below.
protected void Page_Load(object sender, EventArgs e)
    {
        try
        {
            if (!this.IsPostBack)
            {
                grdEmp.DataSource = GetEmployeeData();
                grdEmp.DataBind();
            }
        }
        catch (Exception)
        {
            throw;
        }

    }
Now, you have to run your application while the user clicks on the "Export to Excel button" created JavaScript function will call and export all the records of GridView to excel as shown in the output window below.
Output
Summary
This article gives an explanation about the export GridView to excel using Jquery in asp.net web forms


