Creating a Static Analyzer for C# From Project Templates in Visual Studio

Codingvila
0
''Static code analyzer'' sounds a bit complicated, doesn't it? What if after reading this small note, you will have enough knowledge to create your own static analyzer? Interested? Let's get started!

Overview and Preparation


All further static analyzer development will be based on the .NET Compiler Platform aka Roslyn. This platform provides us the capability to create our own static analysis tools in a matter of minutes. The word "static" in our context means that the analyzed code does not need to be executed.

Since our analyzer will be based on Roslyn, we should install .NET Compiler Platform SDK for our VS. One way we can do this is to open Visual Studio Installer and select Visual Studio extension development in the Workloads tab.

Visual Studio extension development

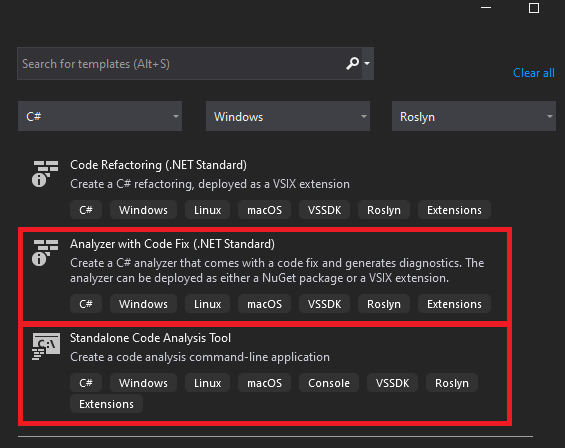
After we have installed the necessary toolset, we can start creating the analyzer. Open VS, click "Create a new project", then select the C# language, specify Windows as the platform, and select Roslyn in the project type. After that, we will see three project templates, of which we are interested two: "Analyzer with Code Fix (.NET Standard)" and "Standalone Code Analysis Tool".

Analyzer with Code Fix (.NET Standard) and Standalone Code Analysis Tool

Let's get acquainted with the template "Analyzer with Code Fix (.NET Standard)".

Creating an Analyzer Based on the Analyzer with Code Fix (.NET Standard) Project Template


After we have created a new project using the template "Analyzer with Code Fix (.NET Standard)", we get a solution with five types of projects inside.

Create New Project

Now our main focus will be on the first project name "TestAnalyzer". This project will contain the main logic of our static analyzer. Open the TestAnalyzerAnalyzer.cs file. It already comprises an example of a simple rule for a static analyzer. The purpose of this rule is to view all the names of types (classes) in the source code and underline them with a green wavy line if a type name contains lowercase characters. In addition, if we hover over the name of the type marked with a green wavy line, we will see a familiar light bulb symbol. It will prompt us to automatically correct the type name and bring all its characters to uppercase.

The easiest way to see the above life is to run a new VS instance that will already have our test diagnostic rule built in. The same principle can be used for debugging. To do this, let's specify the "TestAnalyzer.Vsix" project as "Set as Startup Project" and run the application. An experimental instance of Visual Studio will run after that. Our diagnostic rule will already be integrated into this VS instance using the VSIX extension installed, which has the name of our test analyzer.

Extensions

Next, we will create a new console project in the running VS instance. In it, we will see that the name of the Program class is underlined with a green wavy line – our diagnostic rule is working since the class name contains lowercase characters.

Diagnostic Rule

Creating an Analyzer Based on the Standalone Code Analysis Tool Project Template


Now let's create a new project of the "Standalone Code Analysis Tool" type. In fact, this is a project of an ordinary console application with links to the necessary DLLs for analysis: Microsoft.CodeAnalysis.CSharp.Analyzers.dll, Microsoft.CodeAnalysis.Analyzers.dll, Microsoft.CodeAnalysis.Workspaces.MSBuild.dll, etc. We can delete all methods except Main from the Program.cs file.

Let's write a static analyzer so that it can find if statements with empty bodies. Let's say we don't want the code to contain pieces as follows:
if (number < 0)
{
}
When the analyzer encounters such an element, it writes the line number where it found the appropriate element, as well as the full path from the source file to the log file. Let's move on to writing the code.

In this case, we have a console application, not a plugin for VS. Therefore, in our analyzer's code, we need to specify a path to the solution we are going to analyze. To get a solution, we use the MSBuildWorkspace class and the OpenSolutionAsync method. In turn, the Solution class contains the Projects property, which stores the project entities. In my case, I created a new solution with a single console application project. So to get the entity of a single project, I wrote the following method:
public static Project GetProjectFromSolution(String solutionPath)
{
    MSBuildLocator.RegisterDefaults();
    MSBuildWorkspace workspace = MSBuildWorkspace.Create();
    Solution currSolution = workspace.OpenSolutionAsync(solutionPath).Result;
    Project currProject = currSolution.Projects.Single();
    return currProject;
}
When creating the analyzer using the "Analyzer with Code Fix" project template, we did not change the provided template code. Now we want to write the rule according to which our static analyzer will work. So let me clarify a few theoretical points.

Roslyn itself stores source files' representations as trees. Let's look at the following code example:
if (number > 0)
{
}
Roslyn will present it as a tree with the following structure:

Tree

The nodes of the tree are shown in blue in the picture. In our case, further work will go with them. In Roslyn, such trees are represented by objects of the SyntaxTree type. As we can see from the picture, the nodes are different and each of them is represented by its own type. For example, Roslyn's IfStatement node is represented by an object of the IfStatementSyntax class. All nodes in their inheritance hierarchy are derived from the SyntaxNode class, and only then supplement it with some specific properties and methods. For example, it is logical for an if conditional construct that the IfStatementSyntaxclass has the Condition property inside, which is an ExpressionSyntax type node.

By working with the needed nodes, we can create logic for the rules that our static analyzer will work on. For example, to determine that the if the statement has an empty body, we can use the following logic:
  1. Find all the nodes of the tree with the IfStatementSyntax type.
  2. Access the Statementobject property of the IfStatementSyntax type and check whether it is a node of the BlockSyntax type that encapsulates the necessary information about the code block represented in curly brackets.
  3. Access the BlockSyntax.Statements property. This property represents a list of StatementSyntax objects. Check that the Statements list is not empty. This list is empty when the if block does not contain any StatementSyntax objects (i.e. the if statement's curly braces are empty).

Based on the algorithm above, we can write the following code:
Project currProject = GetProjectFromSolution(solutionPath)
StringBuilder warnings = new StringBuilder();
foreach (var document in currProject.Documents)
{
    var tree = document.GetSyntaxTreeAsync().Result;
    var ifStatementNodes = tree.GetRoot().DescendantNodesAndSelf()
  .Where(x => x.IsKind(SyntaxKind.IfStatement));
    foreach (var node in ifStatementNodes)
    {
        var ifStatement = node as IfStatementSyntax;
        if (ifStatement.Statement is BlockSyntaxblockSyntax && !blockSyntax.Statements.Any())
        {
            warnings.Append($"Empty if block is found in file" +
                  $" {document.FilePath} at line" +
                  $" {ifStatement.GetLocation().GetLineSpan().StartLinePosition.Line + 1}" +
                  $" \n");
        }
    } }
if (warnings.Length != 0)
    File.AppendAllText(logPath, warnings.ToString());
I got this text file as an output of the above simple static analyzer.

What Project Type to Choose for Your Static Analyzer?


In my opinion, the choice should be based on what you ultimately want to get from your static analyzer.

If you are writing a static analyzer that should monitor compliance with the code style adopted in your company, then a project like 'Analyzer with Code Fix' is obviously more suitable here. After all, your analyzer will be conveniently integrated into the VS environment as an extension, and developers will see the results of its work right when writing code. In addition, with the help of the Roslyn API, you can implement hints on how to change the code and even its automatic correction.

There are different usage scenarios. In VS the analyzer can be constantly working as an extension. But if you want to analyze your code after running the analyzer as a separate tool, the "Standalone Code Analysis Tool" project type will be right for you. For example, it is suitable for cases when you want to introduce it in your CI process and test projects on a separate server. There is another reason to choose this project type. The analyzer as a VS extension will exist inside the 32-bit devenv.exe process. This imposes serious restrictions on the amount of memory used. The analyzer as a separate application is not afraid of such restrictions.

Although the article is about writing your own static code analyzer, developers understand this term differently. This article will help you implement a utility that performs a set of actions you need. Classic static code analyzers are much more complex applications that perform deeper and more diverse code analyses.

Commercial code analyzers such as Coverity, PVS-Studio, and Klockwork use data flow analysis technologies, symbolic execution, automatic method annotation, and so on in addition to working with the tree. Implementing something like this in your own analyzer will take a lot of time and effort. Therefore, if you do not solve your particular problems, but plan to detect a wide range of defects in the code, it is more rational to use one of the existing analyzers rather than to write your own. There are quite a lot of them (both commercial and free) - List of tools for static code analysis. Consider learning from the PVS-Studio experience - the team collects errors from open-source projects. It will help to cover the capabilities of such tools. This collection allows you to understand what classic analyzers can do and what they are for.

In addition, we should not forget that such analyzers can provide some of their functions via additional extensions for various IDEs. This is convenient if the plugin allows you to run the analyzer without having to swap between the editor and a separate application, or allows you to view the analysis results directly in the IDE.

Summary


In this article, we learned how to create a static code analyzer based on Visual Studio's two project templates Analyzer with Code Fix (.NET Standard) and Standalone Code Analysis Tool as well as learn about how to choose a template based on a particular scenario and gives an example of a Syntax Tree and a way to traverse it.

Credits

Article Type : Guest Article
Author : Ilya Gainulin
Tags : CSharp, Knowledge
Article Date : 17-03-2021
Article Publish Date : 19-03-2021
Note: All content of this article is copyright of their author.

Post a Comment

0 Comments

Thank you for your valuable time, to read this article, If you like this article, please share this article and post your valuable comments.

Once, you post your comment, we will review your posted comment and publish it. It may take a time around 24 business working hours.

Sometimes I not able to give detailed level explanation for your questions or comments, if you want detailed explanation, your can mansion your contact email id along with your question or you can do select given checkbox "Notify me" the time of write comment. So we can drop mail to you.

If you have any questions regarding this article/blog you can contact us on info.codingvila@gmail.com

Post a Comment
To Top